

When planning a memorable Halloween party, it’s all about the food that delights and surprises your guests. I’ve gathered 12 spine-tingling treats that will wow everyone. From eerie appetizers like Creepy Crawly Deviled Eggs to the tantalizing sweetness of Haunted Graveyard Cupcakes, these dishes promise a night to remember. Curious about what makes these recipes so special? Let’s uncover the secrets together.
Creepy Crawly Deviled Eggs
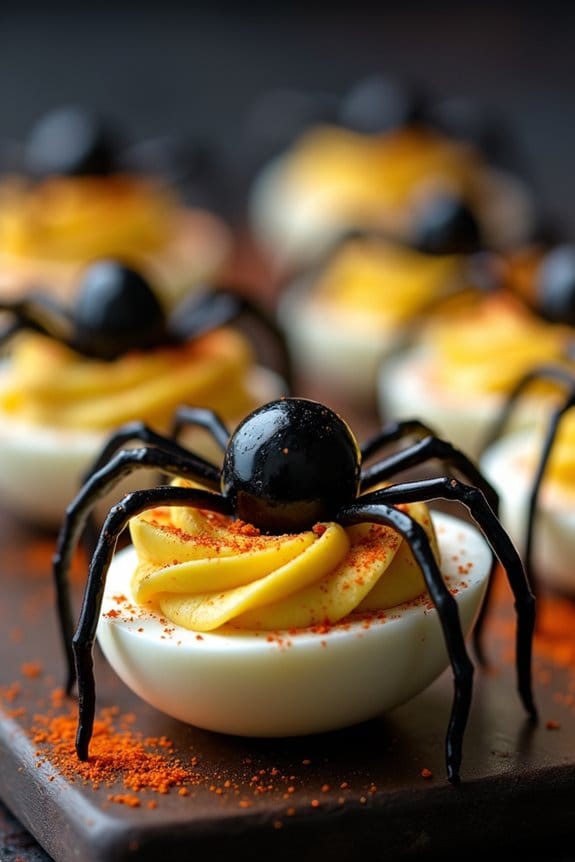
Creepy Crawly Deviled Eggs are a spooktacular addition to any Halloween party spread. This eerie appetizer is a fun twist on the traditional deviled egg, featuring little olive spiders that are sure to give your guests a fright. The creamy yolk filling is enhanced with a hint of mustard and paprika, creating a savory bite with a touch of heat.
Whether you’re hosting a large gathering or a small get-together, these deviled eggs will add a dash of Halloween spirit to your menu. Perfect for a serving size of 4-6 people, these Creepy Crawly Deviled Eggs are easy to prepare and can be made ahead of time, allowing you to focus on other party preparations.
Ideal for intimate gatherings, these spooky deviled eggs bring Halloween cheer and can be prepped ahead for stress-free hosting.
The spider decoration is simple but effective, made using black olives. This recipe not only delivers on taste but also on visual appeal, making it a memorable treat for your holiday festivities.
Ingredients:
- 6 large eggs
- 3 tablespoons mayonnaise
- 1 teaspoon Dijon mustard
- 1/2 teaspoon white vinegar
- Salt, to taste
- Black pepper, to taste
- 1/4 teaspoon paprika, plus more for garnish
- 12 black olives (pitted)
Cooking Instructions:
- Boil the Eggs: Place the eggs in a single layer in a saucepan and add enough water to cover them by about an inch. Bring the water to a rolling boil over medium-high heat, then cover the pan and remove it from heat. Let the eggs sit in the hot water for about 10-12 minutes to cook thoroughly.
- Cool and Peel the Eggs: Carefully drain the hot water and transfer the eggs to a bowl of ice water. Let them cool for at least 5 minutes. Once cooled, peel the eggs gently to avoid tearing the whites.
- Prepare the Filling: Slice each egg in half lengthwise and remove the yolks, placing them in a separate bowl. Add mayonnaise, Dijon mustard, white vinegar, salt, pepper, and paprika to the yolks. Mash and mix until you achieve a smooth, creamy consistency.
- Fill the Egg Whites: Using a spoon or a piping bag, fill each egg white half with the yolk mixture. Guarantee each half is generously filled.
- Create the Olive Spiders: Cut 6 olives in half lengthwise. Use one half for the spider’s body and slice the other half into thin strips to create legs. Place the olive halves on top of the filled eggs to make the spider bodies, and arrange the strips as legs, placing three on each side.
- Garnish and Serve: Lightly sprinkle additional paprika over the top for a dash of color and flavor. Arrange your Creepy Crawly Deviled Eggs on a platter and serve chilled.
Extra Tips:
For a more intense flavor, consider adding a dash of hot sauce to the yolk mixture. If you want to make these deviled eggs ahead of time, prepare the eggs and filling, but wait to assemble the spiders until just before serving to guarantee they look fresh and appealing.
You can also experiment with different types of olives or use food coloring to give the yolk mixture an eerie hue, enhancing the Halloween theme.
Mummy Jalapeño Poppers
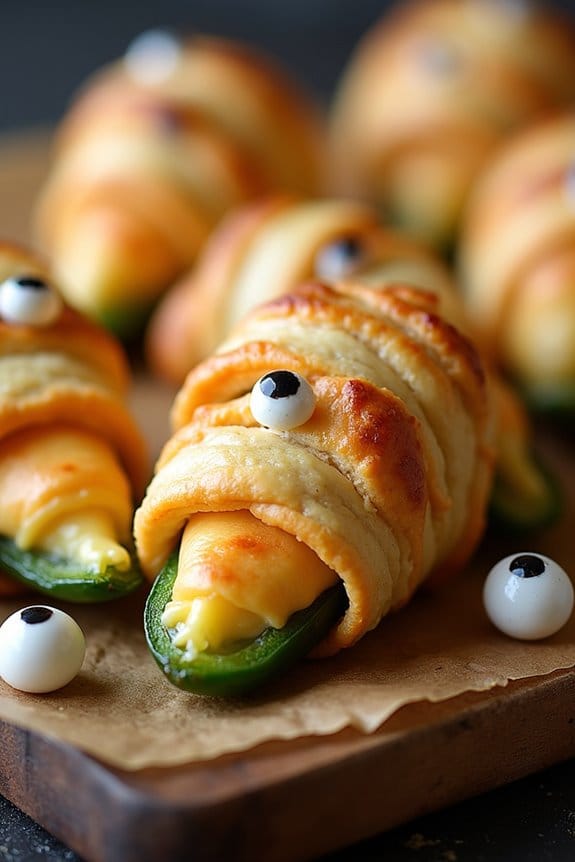
Mummy Jalapeño Poppers are a delightfully spooky addition to any Halloween party spread. These spicy, cheesy treats are wrapped in a flaky, golden crust that resembles a mummy’s wrappings, making them as fun to look at as they’re to eat. With their combination of creamy cheese, crispy bacon, and fiery jalapeños, these poppers deliver a burst of flavor that guests will find irresistible. Perfect for serving at a festive gathering, these Mummy Jalapeño Poppers will surely be a hit with both kids and adults alike.
Not only are these poppers visually appealing, but they also offer a balance of textures and flavors that make them a standout appetizer. The cream cheese filling tempers the heat of the jalapeños, while the bacon adds a smoky, savory note. The crescent roll dough used to create the mummy wraps bakes up into a crispy, buttery shell that holds everything together perfectly. This recipe is easy to prepare and can be made ahead of time, allowing you to spend more time enjoying the party with your guests.
Ingredients for Mummy Jalapeño Poppers (Serves 4-6):
- 12 fresh jalapeño peppers
- 8 ounces cream cheese, softened
- 1 cup shredded cheddar cheese
- 8 slices of bacon, cooked and crumbled
- 1 teaspoon garlic powder
- 1 teaspoon onion powder
- 1 teaspoon smoked paprika
- 1 can (8 ounces) refrigerated crescent roll dough
- 1 egg, beaten (for egg wash)
- Candy eyeballs (optional, for decoration)
Cooking Instructions:
- Prepare the Jalapeños: Preheat your oven to 375°F (190°C). Slice each jalapeño pepper lengthwise and remove the seeds and membranes to reduce the heat to a more manageable level. Set them aside on a lined baking sheet.
- Make the Filling: In a mixing bowl, combine the softened cream cheese, shredded cheddar cheese, crumbled bacon, garlic powder, onion powder, and smoked paprika. Mix the ingredients until well combined and creamy.
- Stuff the Jalapeños: Using a small spoon or a piping bag, fill each halved jalapeño pepper with the cheese and bacon mixture, ensuring it’s packed in and slightly mounded above the cut edge.
- Wrap with Crescent Dough: Unroll the crescent roll dough and cut it into thin strips. Wrap each stuffed jalapeño half with the dough strips, leaving small spaces for the filling to peek through and resemble mummy bandages. Press the ends of the dough to secure them.
- Apply Egg Wash: Using a pastry brush, gently brush the dough-wrapped jalapeños with the beaten egg. This will help them bake to a golden brown color.
- Bake: Place the baking sheet in the preheated oven and bake for 15-20 minutes, or until the dough is golden brown and crispy.
- Decorate: Once out of the oven, let the poppers cool slightly. If desired, place candy eyeballs on the dough to complete the mummy look.
Extra Tips:
For those who prefer a milder flavor, consider substituting jalapeños with mini sweet peppers. When wrapping the poppers with dough, try to avoid overlapping too much, as this can prevent the dough from baking evenly.
If candy eyeballs are unavailable, small dots of cream cheese or a slice of black olive can be used as fun alternatives. These poppers can also be prepared a day in advance and stored in the refrigerator; simply reheat them in the oven before serving to maintain their crispiness.
Witch’s Brew Broccoli Soup
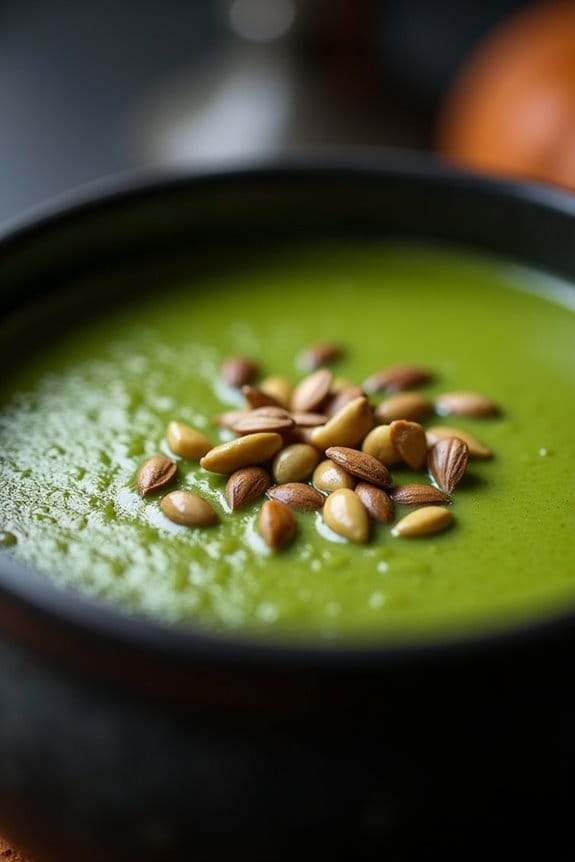
Transform your Halloween party into a cauldron of delight with Witch’s Brew Broccoli Soup. This eerie green soup not only fits the theme of the night but also offers a warm, comforting dish that will enchant your guests.
With its velvety texture and rich flavor, this soup is perfect for a chilly October evening, providing nourishment and a hint of magic. Serve it in black cauldrons or eerie bowls to enhance the spooky atmosphere.
This Witch’s Brew Broccoli Soup isn’t just about the visuals; it’s a healthy and delicious addition to your Halloween menu. Packed with nutrients from the broccoli and a creamy base, it’s both satisfying and guilt-free.
Whether you’re catering to a group of goblins or a family of witches, this soup will captivate and delight. So, don your witch’s hat and get ready to concoct this spellbinding dish for 4-6 people.
Ingredients:
- 2 tablespoons olive oil
- 1 onion, chopped
- 2 cloves garlic, minced
- 1 head of broccoli, cut into florets
- 4 cups vegetable broth
- 1 cup heavy cream
- 1 teaspoon salt
- 1/2 teaspoon black pepper
- 1/2 teaspoon nutmeg
- 1/2 cup shredded cheddar cheese (optional)
- 1/4 cup pumpkin seeds for garnish
Instructions:
- Heat the Oil: In a large pot, heat the olive oil over medium heat. Add the chopped onion and minced garlic, sautéing them until the onion is translucent and the garlic is fragrant, about 5 minutes.
- Add Broccoli: Stir in the broccoli florets, mixing them with the onion and garlic. Cook for another 3 minutes until the broccoli turns bright green.
- Pour the Broth: Pour in the vegetable broth, bringing the mixture to a boil. Once boiling, reduce the heat to low, cover, and let it simmer for about 15-20 minutes, or until the broccoli is tender.
- Blend the Soup: Remove the pot from heat. Using an immersion blender, purée the soup until smooth and creamy. Alternatively, you can transfer the soup in batches to a countertop blender.
- Add Cream and Season: Return the pot to the heat. Stir in the heavy cream, salt, black pepper, and nutmeg. Heat the soup gently over low heat, stirring occasionally, until it’s warmed through.
- Incorporate Cheese: If you’re using cheese, add it to the soup and stir until it’s melted and fully incorporated, giving the soup a cheesy, rich flavor.
- Serve and Garnish: Ladle the soup into bowls or cauldrons, and garnish with pumpkin seeds to add a bit of crunch and a spooky touch.
Extra Tips:
For a vegan version, replace the heavy cream with coconut milk and skip the cheese, or use a vegan cheese alternative.
If you prefer a thicker consistency, add a peeled and chopped potato to the soup during the simmering stage. This will naturally thicken the soup as it cooks.
Additionally, if you want to enhance the green color, consider adding a handful of fresh spinach leaves before blending.
This Witch’s Brew Broccoli Soup can be made a day in advance; just reheat it gently before serving.
Ghostly White Pizza

Looking to add a spooky twist to your Halloween party menu? Try serving a Ghostly White Pizza that will delight both kids and adults alike.
Serve a Ghostly White Pizza to enchant Halloween guests, delighting both kids and adults with its spooky charm.
This eerie yet delicious pizza features a creamy white sauce base, topped with ghost-shaped mozzarella slices and a variety of white toppings that evoke a hauntingly festive atmosphere. It’s perfect as a main dish or as a fun addition to your Halloween buffet table.
Its simplicity and flavor will make it a crowd-pleaser, while its ghostly appearance will add an element of fun to your celebration. This recipe serves 4-6 people and is as easy to make as it’s to enjoy. Let your creativity run wild as you assemble these ghostly pies, bringing a touch of Halloween spirit to your table.
Ingredients:
- 1 large pizza dough (store-bought or homemade)
- 1 1/2 cups ricotta cheese
- 1/2 cup grated Parmesan cheese
- 1 1/2 cups shredded mozzarella cheese
- 1/2 cup sliced white mushrooms
- 1/2 cup sliced artichoke hearts
- 1/4 cup diced onions
- 1/4 cup sliced black olives (for eyes)
- 1 tablespoon olive oil
- 1 teaspoon garlic powder
- 1 teaspoon dried oregano
- Salt and pepper to taste
Cooking Instructions:
- Preheat the Oven: Start by preheating your oven to 475°F (245°C). Confirm the oven rack is positioned in the middle for even baking.
- Prepare the Dough: Roll out your pizza dough on a lightly floured surface, aiming for a round shape about 12 inches in diameter. Transfer the dough to a baking sheet or pizza stone lined with parchment paper.
- Make the Sauce: In a small bowl, mix the ricotta cheese, Parmesan cheese, garlic powder, oregano, salt, and pepper until well combined. This will be your white pizza base.
- Assemble the Pizza: Spread the ricotta mixture evenly over the pizza dough, leaving a small border around the edges. Sprinkle the shredded mozzarella over the top.
- Add the Toppings: Arrange the white mushrooms, artichoke hearts, and onions evenly over the cheese. Cut the mozzarella slices into ghost shapes using a ghost-shaped cookie cutter and place them strategically on top of the pizza.
- Add the Eyes: Use small slices of black olives to create eyes for each ghost-shaped mozzarella piece, giving them a spooky character.
- Bake the Pizza: Drizzle olive oil over the top and place the pizza in the preheated oven. Bake for 12-15 minutes, or until the crust is golden brown and the cheese is bubbly and slightly browned.
- Serve and Enjoy: Once baked, remove the pizza from the oven and let it cool for a few minutes. Slice and serve your Ghostly White Pizza warm to your Halloween guests.
Extra Tips:
For a crispier crust, consider pre-baking the pizza dough for 5 minutes before adding the toppings. If you don’t have a ghost-shaped cookie cutter, you can use a knife to cut the shapes freehand.
Feel free to get creative with additional toppings like white asparagus or cauliflower for more texture and flavor. Remember, the key is to have fun and embrace the spooky theme!
Spooky Stuffed Peppers

Halloween is the perfect time to get creative in the kitchen, and Spooky Stuffed Peppers are sure to be a hit at your festive gathering. These delightful treats not only look the part but are also packed with flavor. The peppers are carved to resemble spooky jack-o’-lanterns, adding a touch of fun and fright to your party spread. Inside, they’re filled with a savory mixture of rice, ground beef, and a blend of spices that will satisfy your guests’ appetites.
Whether you’re hosting a Halloween party or just looking for a fun family meal, these stuffed peppers are a great choice. The beauty of this dish lies in its versatility. You can easily adapt the stuffing to suit different dietary preferences by swapping out the beef for a plant-based alternative or adding more vegetables. The peppers can be customized regarding their faces, allowing you to get as creative as you like with your carving.
Best of all, you can prepare these peppers ahead of time and bake them just before serving, making them a convenient and delicious option for any Halloween celebration.
Ingredients (Serves 4-6):
- 6 medium-sized bell peppers (orange preferred for a pumpkin look)
- 1 pound ground beef (or plant-based alternative)
- 1 cup cooked rice
- 1 can (15 oz) black beans, drained and rinsed
- 1 can (15 oz) diced tomatoes
- 1 small onion, chopped
- 2 cloves garlic, minced
- 1 teaspoon cumin
- 1 teaspoon chili powder
- 1 cup shredded cheddar cheese
- Salt and pepper to taste
- Olive oil
- Fresh cilantro for garnish (optional)
Cooking Instructions:
- Preheat the Oven: Start by preheating your oven to 375°F (190°C).
- Prepare the Peppers: Slice the tops off the bell peppers and remove the seeds and membranes. Using a small knife, carefully carve jack-o’-lantern faces into the sides of the peppers. Set the peppers aside.
- Cook the Filling: In a large skillet over medium heat, add a drizzle of olive oil. Add the chopped onion and minced garlic, and sauté until the onion becomes translucent, about 3-4 minutes.
- Brown the Meat: Add the ground beef to the skillet and cook until it’s browned and cooked through, breaking it apart as it cooks.
- Mix the Filling: Stir in the cooked rice, black beans, diced tomatoes, cumin, chili powder, salt, and pepper. Mix well and let the filling simmer for about 5 minutes to allow the flavors to meld together. Remove from heat.
- Stuff the Peppers: Spoon the filling mixture into each hollowed-out bell pepper, packing it tightly. Top each pepper with a generous amount of shredded cheddar cheese.
- Bake the Peppers: Place the stuffed peppers in a baking dish, ensuring they’re upright. Bake in the preheated oven for 25-30 minutes, or until the peppers are tender and the cheese is melted and bubbly.
- Garnish and Serve: Once baked, remove the peppers from the oven and let them cool slightly. Garnish with fresh cilantro if desired, and serve warm.
Extra Tips:
For an extra layer of flavor, you can add a splash of Worcestershire sauce to the filling mixture or incorporate chopped jalapeños for a spicy kick. If you prefer softer peppers, you can blanch them in boiling water for about 2-3 minutes before stuffing.
Keep an eye on the peppers while baking to prevent them from becoming too soft. If you’re preparing these ahead of time, stuff the peppers and refrigerate them until you’re ready to bake. This dish pairs well with a side of sour cream or a simple green salad.
Eyeball Caprese Skewers
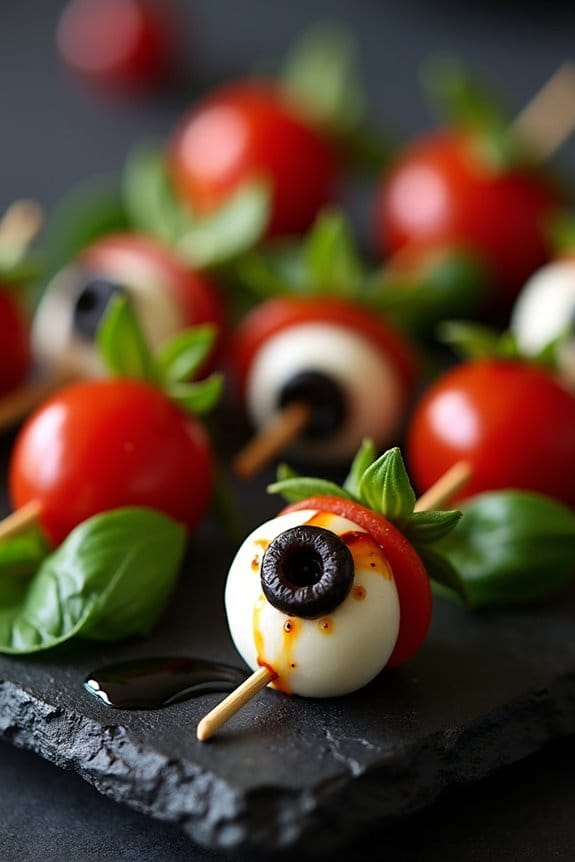
Eyeball Caprese Skewers are a spooky twist on the classic Italian appetizer that’s perfect for your Halloween party spread. These skewers are both visually striking and delicious, featuring mozzarella balls transformed into eerie eyeballs with the help of black olives and a touch of red food coloring.
Paired with juicy cherry tomatoes and fresh basil leaves, they offer a burst of flavor that’s guaranteed to delight your guests. The simple yet effective presentation will add a creepy charm to your party while remaining easy to prepare and serve.
This dish not only looks festive but is also a healthy option that balances the indulgence of Halloween treats. The combination of creamy mozzarella, the acidity of tomatoes, and the aromatic basil creates a harmonious blend that’s further enhanced by a drizzle of balsamic glaze.
Perfect for serving 4-6 people, these Eyeball Caprese Skewers are a must-have for your Halloween gathering, offering a fun and flavorful experience for all ages.
Ingredients for 4-6 People:
- 12 cherry tomatoes
- 12 mini mozzarella balls
- 6 black olives, pitted and sliced into rings
- 12 fresh basil leaves
- 1 tablespoon of olive oil
- 1 tablespoon of balsamic glaze
- 1-2 drops of red food coloring
- Salt and pepper to taste
- 12 wooden skewers or toothpicks
Cooking Instructions:
- Prepare the Eyeballs: Take the mini mozzarella balls and use a small teaspoon or the end of a straw to make a tiny indent on each mozzarella ball. Place a black olive ring into the indent to create the “iris” of the eyeball. Dab a small drop of red food coloring onto the mozzarella around the olive to give the appearance of bloodshot eyes.
- Assemble the Skewers: Thread each skewer with one cherry tomato, one basil leaf, and one mozzarella “eyeball.” Repeat the sequence until you have two of each on a skewer. The cherry tomato and basil leaf will sandwich the mozzarella ball to keep it in place.
- Season and Dress: Lightly drizzle olive oil over the assembled skewers, then sprinkle with salt and pepper to taste. Follow with a drizzle of balsamic glaze for added flavor and presentation.
- Serve: Arrange the skewers on a platter, spacing them evenly. For an added Halloween effect, you can place the skewers in a carved-out pumpkin or a spooky-themed serving dish.
Extra Tips:
For an added touch of Halloween spookiness, consider using red or black serving platters to contrast with the white mozzarella and bright tomatoes.
If you want to prepare these skewers ahead of time, assemble them and keep them refrigerated without the olive oil and balsamic glaze. Add the dressing just before serving to guarantee the skewers stay fresh and vibrant.
If you’re catering to children or guests who might be sensitive to food coloring, you can skip the red food coloring and still have a fantastic presentation.
Graveyard Taco Dip

Graveyard Taco Dip is the perfect eerie addition to your Halloween party spread. This spooky dip combines layers of creamy, spicy, and savory flavors, creating a delicious treat that looks like a haunted graveyard. The top layer is decorated with tombstone-shaped tortilla chips, adding a festive and chilling touch to your party table. Not only is it visually appealing, but it’s also incredibly tasty, guaranteeing that it will be a hit with both kids and adults alike.
This dish is ideal for gatherings of 4-6 people, making it a great choice for intimate Halloween get-togethers. The combination of refried beans, guacamole, sour cream, and seasoned ground beef guarantees that every bite is packed with flavor. The Graveyard Taco Dip is easy to prepare, allowing you to spend more time enjoying the festivities and less time in the kitchen. Whether you’re hosting a family party or a spooky-themed dinner, this dip is sure to impress.
Ingredients for 4-6 servings:
- 1 can (16 oz) refried beans
- 1 packet taco seasoning
- 1 lb ground beef
- 1 cup guacamole
- 1 cup sour cream
- 1 cup salsa
- 1 cup shredded cheddar cheese
- 1/2 cup sliced black olives
- 1/2 cup chopped green onions
- Tortilla chips (for tombstones)
- Fresh cilantro for garnish
Cooking Instructions:
- Prepare the Beef: In a skillet over medium heat, cook the ground beef until it’s browned. Drain excess fat. Add the taco seasoning and mix well, cooking for another 1-2 minutes until the seasoning is fully incorporated. Set aside to cool slightly.
- Layer the Bean Base: Spread the refried beans evenly at the bottom of a shallow serving dish. This will be the first layer and base of your taco dip.
- Add the Beef Layer: Once the seasoned ground beef has cooled, spread it evenly over the refried beans layer.
- Spread the Guacamole: Carefully spoon the guacamole over the beef layer, smoothing it out with the back of a spoon to create an even layer.
- Add Sour Cream and Salsa: Gently spread the sour cream over the guacamole layer, followed by an even layer of salsa.
- Cheese and Toppings: Sprinkle the shredded cheddar cheese evenly over the salsa layer. Then, add the sliced black olives and chopped green onions on top.
- Create Tombstones: Cut tortilla chips into tombstone shapes. Insert them upright into the dip to create a graveyard effect. You can use a food-safe marker to write spooky messages on the “tombstones” if desired.
- Garnish and Serve: Sprinkle fresh cilantro over the top for added flavor and color. Serve the dip with additional tortilla chips on the side for dipping.
Extra Tips:
To make your Graveyard Taco Dip even more festive, consider using cookie cutters to create fun shapes from the tortilla chips. You can also personalize the tombstones with spooky messages using edible markers.
For a vegetarian version, simply omit the ground beef and add extra layers of vegetables like diced tomatoes, bell peppers, or corn. Preparing the dip a few hours in advance allows the flavors to meld together, but be sure to add the tortilla chip tombstones and garnish just before serving to keep them crisp.
Pumpkin Cheese Ball
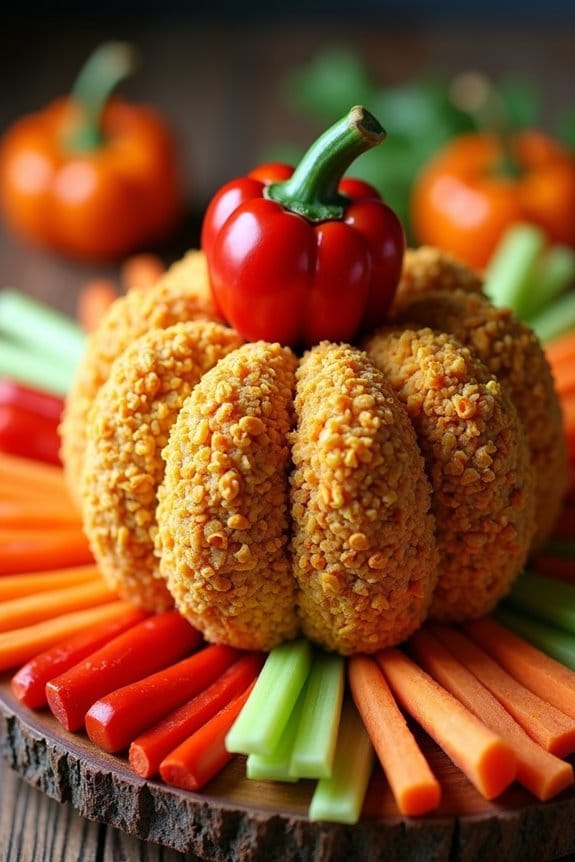
Halloween is a time for spooky fun, and what better way to delight your guests than with a Pumpkin Cheese Ball? This festive dish combines creamy cheese with savory spices, all wrapped up in a delightful pumpkin shape that will be the star of your party table. Not only is it visually appealing, but it also offers a rich flavor that pairs perfectly with crackers or fresh vegetables.
Whether you’re hosting a large gathering or an intimate get-together, this Pumpkin Cheese Ball is sure to impress. The magic of a Pumpkin Cheese Ball lies in its simplicity and its ability to bring a touch of whimsy to your Halloween spread. Perfect for serving 4-6 people, this recipe is easy to prepare and can be made well in advance, leaving you stress-free on the day of your event.
With just a few key ingredients and some creative shaping, you’ll have a delicious appetizer that looks as good as it tastes. Let’s plunge into the ingredients and steps needed to create this Halloween masterpiece.
Ingredients (Serves 4-6):
- 2 (8-ounce) packages cream cheese, softened
- 1 1/2 cups shredded sharp cheddar cheese
- 1 tablespoon Worcestershire sauce
- 2 teaspoons garlic powder
- 1 teaspoon smoked paprika
- 1/2 teaspoon salt
- 1/4 teaspoon black pepper
- 1/4 cup finely chopped green onions
- 1 cup crushed pretzels
- 1 small bell pepper, stem removed (for the pumpkin stalk)
Cooking Instructions:
- Mix the Base: In a large mixing bowl, combine the softened cream cheese, shredded cheddar cheese, Worcestershire sauce, garlic powder, smoked paprika, salt, and black pepper. Use an electric mixer or a sturdy spoon to blend the ingredients until smooth and well-combined.
- Add Flavor: Stir in the chopped green onions, mixing them evenly throughout the cheese mixture. This will add a burst of fresh flavor to your cheese ball.
- Shape the Cheese Ball: Line a small bowl with plastic wrap, leaving enough overhang to cover the cheese mixture. Transfer the cheese mixture into the bowl, pressing it down firmly. Once filled, wrap the excess plastic wrap around the cheese to form a ball shape. Chill in the refrigerator for at least 2 hours or until firm.
- Coat the Cheese Ball: Once firm, remove the cheese ball from the bowl and unwrap it. Roll the cheese ball in crushed pretzels until fully coated, pressing gently to confirm they adhere.
- Create the Pumpkin Shape: Using your hands, gently shape the cheese ball into a pumpkin by creating vertical grooves with your fingers. Insert the bell pepper stem on top to mimic a pumpkin stalk.
- Serve and Enjoy: Place the pumpkin cheese ball on a platter surrounded by your choice of crackers, sliced vegetables, or breadsticks for dipping. Serve immediately or refrigerate until ready to serve.
Extra Tips:
To make your Pumpkin Cheese Ball even more colorful and festive, consider adding a few drops of orange food coloring to the cheese mixture before chilling, giving it a truly pumpkin-like hue.
If you prefer a spicier kick, incorporate a dash of cayenne pepper or finely chopped jalapeños into the mix. Remember to adjust the seasoning to your taste as needed.
Finally, for a smoother and easier shaping process, confirm the cream cheese is fully softened before starting, and allow the cheese ball to chill thoroughly before coating and serving. Enjoy your Halloween festivities with this delightful and eye-catching appetizer!
Monster Guacamole and Chips
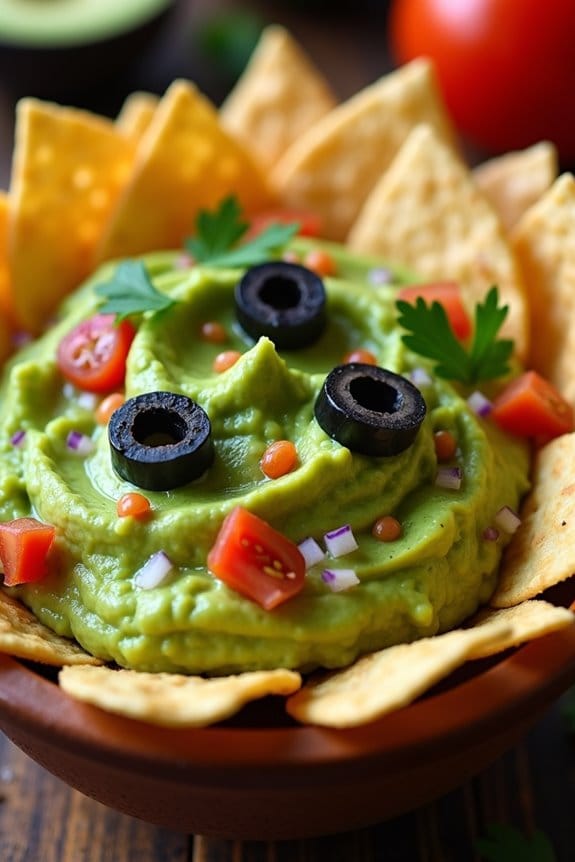
If you’re looking for a ghoulishly delightful appetizer to serve at your Halloween party, search no further than Monster Guacamole and Chips. This spooky snack isn’t only fun to make but also a healthy option that your guests will love. The vibrant green guacamole represents the classic monster theme, while the chips add a crunchy, satisfying bite. Perfect for dipping and sharing, this dish will surely be a hit at your Halloween gathering.
Monster Guacamole and Chips can be easily customized with your favorite seasonings, and it’s a breeze to prepare. The key to this dish is achieving the perfect guacamole texture and flavor, along with arranging the chips in a fun and creative way to mimic monster teeth or claws. This recipe serves 4-6 people, making it ideal for a small party or a family gathering. Get ready to impress your guests with this monstrously tasty treat!
Ingredients (serves 4-6):
- 4 ripe avocados
- 1 lime, juiced
- 1/2 teaspoon salt
- 1/2 teaspoon ground cumin
- 1/2 teaspoon cayenne pepper
- 1/2 medium red onion, finely diced
- 2 Roma tomatoes, seeded and diced
- 1 tablespoon chopped cilantro
- 1 clove garlic, minced
- 1 cup tortilla chips
- Black olives, sliced (for decoration)
Instructions:
- Prepare the Avocados: Cut the avocados in half, remove the pits, and scoop the flesh into a mixing bowl. Use a fork to mash the avocados to your desired consistency—smooth or chunky.
- Season the Guacamole: Add the lime juice, salt, ground cumin, and cayenne pepper to the mashed avocados. Mix well to combine all the flavors.
- Mix in the Vegetables: Add the finely diced red onion, diced tomatoes, chopped cilantro, and minced garlic to the avocado mixture. Stir until evenly distributed.
- Taste and Adjust: Taste the guacamole and adjust the seasoning if necessary, adding more lime juice or salt to suit your preference.
- Assemble the Dish: Transfer the guacamole to a serving bowl. Place the tortilla chips around the bowl, arranging them to look like monster teeth or claws.
- Decorate: Use sliced black olives to create “eyes” or other monster features on top of the guacamole for a spooky effect.
Extra Tips: When making guacamole, it’s important to use ripe avocados for the best texture and flavor. To check if an avocado is ripe, gently press the skin—it should yield slightly to pressure.
If you’re preparing the guacamole in advance, keep it covered with plastic wrap directly on the surface to prevent browning. For an extra kick, consider adding a finely chopped jalapeño or a splash of hot sauce to the mix. Enjoy your Monster Guacamole and Chips as a fun and festive addition to your Halloween party!
Bat Wing Chicken Drumsticks
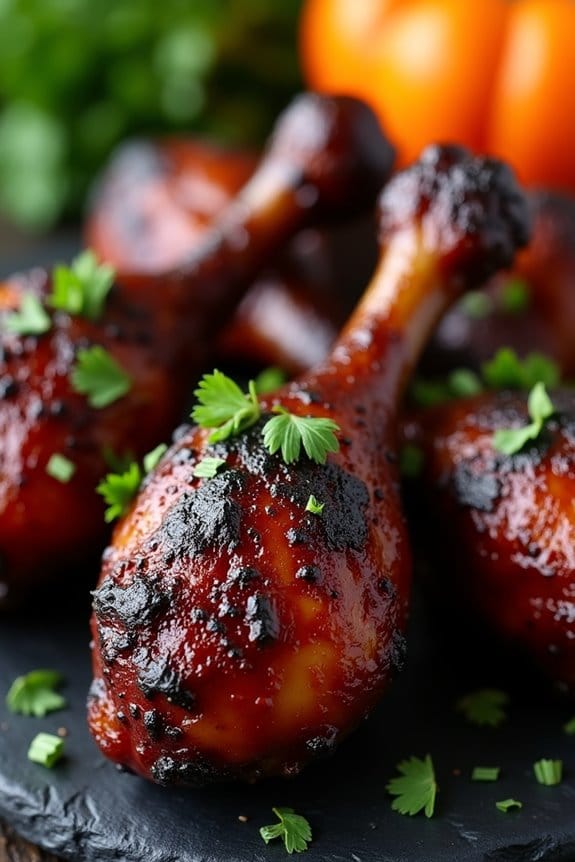
Bat Wing Chicken Drumsticks are a spooky and delicious addition to any Halloween party spread. These flavorful drumsticks are marinated in a dark, savory sauce that gives them a unique color reminiscent of bat wings, making them the perfect thematic treat. The marinade combines soy sauce, balsamic vinegar, honey, and dark spices to infuse the chicken with deep flavors, while a touch of black food coloring gives them their signature eerie appearance.
Once baked to perfection, these drumsticks offer a juicy, tender bite with a crispy exterior that both kids and adults will love. To create the perfect Bat Wing Chicken Drumsticks, you’ll need to plan ahead to allow time for marinating. This guarantees the chicken absorbs all the wonderful flavors and achieves the desired dark hue. The dish requires minimal effort and can be prepped in advance, making it an ideal choice for busy hosts.
Serve them as a stand-alone appetizer or pair them with other Halloween-themed dishes to impress your guests with a frightfully fun feast.
Ingredients (serving size: 4-6 people):
- 12 chicken drumsticks
- 1/2 cup soy sauce
- 1/4 cup balsamic vinegar
- 2 tablespoons honey
- 1 tablespoon olive oil
- 2 cloves garlic, minced
- 1 teaspoon ground black pepper
- 1 teaspoon smoked paprika
- 1/2 teaspoon ground cumin
- 1/2 teaspoon onion powder
- 1/2 teaspoon garlic powder
- 1/4 teaspoon cayenne pepper (optional)
- Black food coloring (gel or liquid)
- Fresh parsley, chopped (for garnish)
Cooking Instructions:
- Prepare the Marinade: In a large mixing bowl, combine the soy sauce, balsamic vinegar, honey, olive oil, and minced garlic. Whisk together until the honey is fully dissolved.
- Add Spices: Stir in the ground black pepper, smoked paprika, cumin, onion powder, garlic powder, and cayenne pepper (if using) to the marinade. Mix until all ingredients are well incorporated.
- Color the Marinade: Gradually add black food coloring to the marinade, mixing well until you achieve the desired dark hue that resembles bat wings.
- Marinate the Chicken: Place the chicken drumsticks in a large resealable plastic bag or a shallow dish. Pour the prepared marinade over the drumsticks, guaranteeing each piece is fully coated. Seal the bag or cover the dish and refrigerate for at least 2 hours, or overnight for the best flavor.
- Preheat the Oven: When ready to cook, preheat your oven to 400°F (200°C).
- Arrange for Baking: Line a baking sheet with aluminum foil or parchment paper, and place a wire rack on top. This allows the heat to circulate evenly around the drumsticks. Arrange the marinated drumsticks on the rack, spacing them evenly apart.
- Bake the Drumsticks: Bake in the preheated oven for 35 to 40 minutes, or until the chicken is cooked through and the skin is crispy. For extra crispiness, you can broil the drumsticks on high for an additional 3-5 minutes, watching closely to prevent burning.
- Garnish and Serve: Remove the drumsticks from the oven and let them rest for a few minutes. Garnish with freshly chopped parsley before serving.
Extra Tips:
For the best results, make sure to marinate the chicken for a minimum of 2 hours, but overnight is ideal for deeper flavor penetration. If you prefer spicier wings, feel free to increase the amount of cayenne pepper or add a dash of hot sauce to the marinade.
When using food coloring, start with a small amount and gradually increase until you reach the desired color. If you’re serving these at a party, consider providing moist towelettes or napkins for easy cleanup, as these drumsticks can be delightfully messy to eat!
Spiderweb Chocolate Bark
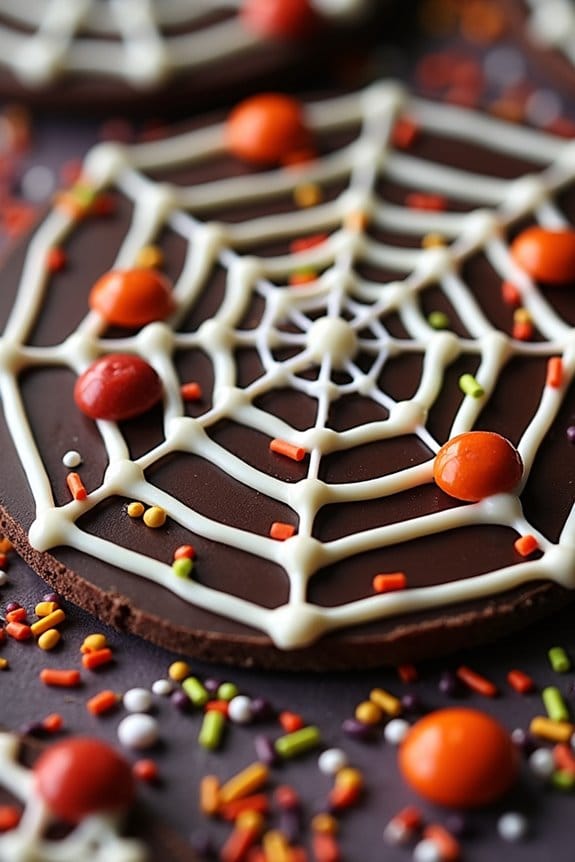
Spiderweb Chocolate Bark is a delicious and visually enchanting treat that’s perfect for Halloween parties. This easy-to-make dessert combines rich, dark chocolate with a creative white chocolate spiderweb design, making it a festive addition to your spooky celebration.
With just a few ingredients and simple steps, you can create a batch of this delectable chocolate bark that will impress both kids and adults alike. Not only is Spiderweb Chocolate Bark a delight to taste, but it also serves as a fun activity you can enjoy with friends or family.
Whether you’re hosting a large gathering or an intimate get-together, this recipe serves 4-6 people and offers a great opportunity to get creative in the kitchen. The contrasting colors and textures make it a standout on the dessert table and a sure conversation starter.
Ingredients (Serves 4-6):
- 12 ounces dark chocolate chips
- 4 ounces white chocolate chips
- 1 teaspoon coconut oil (optional)
- Halloween-themed sprinkles or candies (optional)
Instructions:
- Prepare the Baking Sheet: Line a baking sheet with parchment paper. This will prevent the chocolate from sticking and make it easy to remove once it has set.
- Melt the Dark Chocolate: In a microwave-safe bowl, combine the dark chocolate chips with ½ teaspoon of coconut oil (optional). Microwave in 30-second intervals, stirring in between, until completely melted and smooth.
- Pour and Spread: Pour the melted dark chocolate onto the prepared baking sheet. Use a spatula to spread it evenly into a rectangle, about ¼ inch thick.
- Melt the White Chocolate: In another microwave-safe bowl, melt the white chocolate chips with the remaining ½ teaspoon of coconut oil (optional), using the same method as the dark chocolate.
- Create the Spiderweb Design: Transfer the melted white chocolate to a piping bag or a plastic zip-top bag with a small corner snipped off. Starting from the center of the dark chocolate rectangle, pipe a spiral moving outward. Use a toothpick to draw lines from the center to the edge, creating a spiderweb pattern.
- Add Decorations: If desired, sprinkle Halloween-themed sprinkles or candies over the chocolate before it sets to add extra festive flair.
- Set the Chocolate: Allow the chocolate to cool and harden completely at room temperature or place it in the refrigerator for about 20-30 minutes.
- Break into Pieces: Once set, break the chocolate bark into irregular pieces and serve.
Extra Tips:
To make sure the chocolate doesn’t seize, make sure no water comes into contact with it while melting. You can also melt the chocolate using a double boiler if you prefer more control over the melting process.
If you want to add a bit of texture, consider incorporating chopped nuts or dried fruits along with the candies and sprinkles. Store any leftovers in an airtight container at room temperature or in the refrigerator to keep the chocolate firm and fresh.
Haunted Graveyard Cupcakes

Bring the spookiness of Halloween to life with these delightful Haunted Graveyard Cupcakes. Perfect for a Halloween party, these cupcakes combine rich chocolate flavors with a creative and eerie presentation. Each cupcake is decorated to resemble a miniature haunted graveyard, complete with tombstones, ghosts, and other creepy elements. They not only taste delicious but also serve as an exciting centerpiece for your spooky celebration.
Summon Halloween spirits with these spooky, chocolaty Haunted Graveyard Cupcakes—perfect for your eerie party centerpiece!
This recipe yields 12 cupcakes, making it ideal for a small gathering of 4-6 people, allowing each guest to indulge in two cupcakes. The cupcakes are moist and chocolaty, topped with a dark chocolate frosting that mimics the look of freshly dug dirt. With a bit of creativity and some simple decorations, these cupcakes will be a hit at your Halloween party. Let’s plunge into the ingredients and steps needed to bring these spooky treats to life.
Ingredients:
- 1 cup all-purpose flour
- 1 cup granulated sugar
- 1/2 cup unsweetened cocoa powder
- 1 teaspoon baking powder
- 1/2 teaspoon baking soda
- 1/4 teaspoon salt
- 1/2 cup unsalted butter, melted
- 2 large eggs
- 1 teaspoon vanilla extract
- 1/2 cup whole milk
- 1/2 cup boiling water
For the frosting:
- 1/2 cup unsalted butter, softened
- 1/2 cup unsweetened cocoa powder
- 2 cups powdered sugar
- 1/4 cup whole milk
- 1 teaspoon vanilla extract
For the decorations:
- Chocolate sandwich cookies (crushed, for “dirt”)
- Oval-shaped cookies (for tombstones)
- Black decorating gel
- Candy pumpkins
- Mini marshmallows (for ghosts)
- Edible eyes
Instructions:
- Preheat the Oven: Preheat your oven to 350°F (175°C). Line a 12-cup muffin tin with cupcake liners.
- Mix the Dry Ingredients: In a large mixing bowl, combine the flour, sugar, cocoa powder, baking powder, baking soda, and salt. Stir well until evenly mixed.
- Add the Wet Ingredients: Add the melted butter, eggs, and vanilla extract to the dry ingredients. Mix on medium speed until well blended. Gradually add the milk, then the boiling water, mixing on low speed until the batter is smooth and runny.
- Bake the Cupcakes: Pour the batter evenly into the prepared muffin cups, filling each about two-thirds full. Bake for 18-20 minutes, or until a toothpick inserted into the center comes out clean. Allow the cupcakes to cool completely on a wire rack.
- Prepare the Frosting: In a separate bowl, beat the softened butter until creamy. Add the cocoa powder and mix until combined. Gradually add the powdered sugar and milk, alternating between the two, and beat until smooth and fluffy. Mix in the vanilla extract.
- Frost the Cupcakes: Once the cupcakes are cool, spread a generous amount of frosting over each one. Use a spatula or spoon to create a rough, uneven texture that resembles dirt.
- Decorate: Crush the chocolate sandwich cookies to create “dirt” and sprinkle over the frosted cupcakes. Write “RIP” or other spooky messages on the oval cookies with black decorating gel to create tombstones and insert them into the cupcakes. Add candy pumpkins and use mini marshmallows topped with edible eyes for ghosts.
Extra Tips:
For an extra spooky effect, consider adding a few drops of green food coloring to the frosting for a moldy look or use edible glitter for a magical touch. Customize your graveyard with different decorations like gummy worms or candy bones.
Make sure to refrigerate the cupcakes if not serving immediately, especially if the room is warm, to keep the frosting firm and decorations intact. Enjoy your hauntingly delicious creation!
